-
[넘블 챌린지] 색깔 찾기 게임 만들기리액트 2022. 2. 13. 16:03
게임을 만들며 했던 고민들
- 컴포넌트를 어떻게 나눌 것인가?
색깔 찾기 게임을 만들며 핵심 state를 제어하기 위해서는 컴포넌트마다 여기저기 놓여있는 것보다 한 곳에서 제어하는 것이 편할 것이라고 생각하여 핵심 state 제어 관련 기능은 App.tsx에서 구현했습니다.
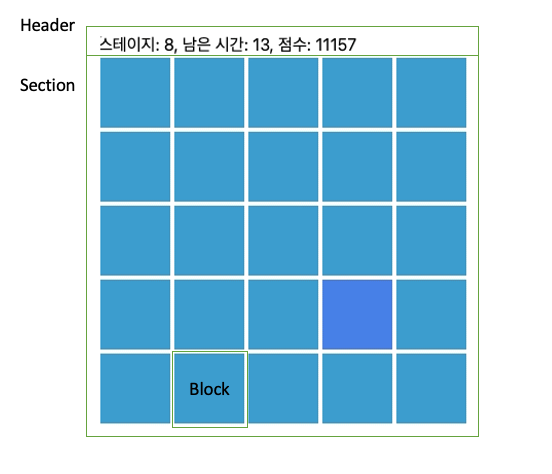
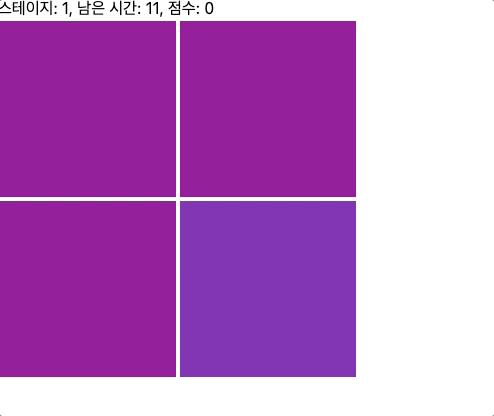
컴포넌트는 Block, Section, Header로 나누었습니다. Header은 게임 상단의 스테이지, 남은 시간, 점수를 포함하는 컨테이너입니다. Section은 실제 게임을 담은 컨테이너며, Block은 각 색깔이 담아있는 컨테이너입니다.
모두 논리 관련이 아닌 아래의 Section 컴포넌트의 코드와 같이 스타일 관련 코드로 이루어져 있습니다.
// Section Component
import styled from "styled-components";

interface SectionProps {
  sectionWidthHeight: number;
}

const SectionContainer = styled.div<SectionProps>`
  display: flex;
  flex-flow: row wrap;
  width: ${(props) => props.sectionWidthHeight}px;
  height: ${(props) => props.sectionWidthHeight}px;
  margin: 0;
  padding: 0;
`;

const Section: React.FC<SectionProps> = ({ sectionWidthHeight, children }) => {
  return (
    <SectionContainer sectionWidthHeight={sectionWidthHeight}>
      {children}
    </SectionContainer>
  );
};

export default Section;
최종적으로 App.tsx에서는 아래와 같이 렌더링하도록 했습니다.
const App: React.FC = () => {
  // 생략...

  return (
    <>
      <Header stage={stage} timeLeft={timeLeft} score={score} />
      <Section sectionWidthHeight={SECTION_WIDTH_HEIGHT}>
        {array.map((val, index) => (
          <Block
            key={`${val.backgroundColor}${index}`}
            backgroundColor={val.backgroundColor}
            width={val.width}
            onClick={() => {
              val.onClickHandler();
            }}
          />
        ))}
      </Section>
    </>
  );
};
- 어떤 state들을 선언할 것인가?
1. stage, timeLeft, score state
기본적으로 stage, timeLeft, score은 필수 요소라고 생각했으며, 그 외에 어떤 state들을 선언할지에 대해서 고민했었습니다.
2. block state
스테이지가 바뀔때마다 블록의 수, 각 블록의 배경색 및 크기 등 여러 상태들이 바뀌기에 이를 좀 더 쉽게 제어하기 위해 state에 stage마다 바뀔 수 있는 요소들을 객체로 관리하도록 했습니다. 그리고 stage마다 바뀌는 값들은 getBlock이라는 함수에서 관리할 수 있도록 했습니다.
const getBlock = (stage: number) => {
    const blockPerLine = Math.floor((stage + 3) / 2);
    const RGB = randomRGBGenerator(stage);

    const width =
      (SECTION_WIDTH_HEIGHT - 2 * BLOCK_MARGIN * blockPerLine) / blockPerLine;
    const arrayLength = blockPerLine ** 2;
    const backgroundColor = RGB.original;
    const answer = randomAnswerGenerator(arrayLength);
    const answerBackgroundColor = RGB.twist;

    return {
      width,
      arrayLength,
      backgroundColor,
      answer,
      answerBackgroundColor,
    };
  };

  const { width, arrayLength, backgroundColor, answer, answerBackgroundColor } =
    getBlock(stage);

  const [block, setBlock] = useState({
    width,
    arrayLength,
    backgroundColor,
    answer,
    answerBackgroundColor,
  });
3. array state
또한, 정답을 포함하는 블록들을 담는 배열은 따로 useCallback을 통해 관리할 수 있도록 했습니다. 이는 배열을 함수로 관리하고자 하는 의미도 있지만 각 블록마다의 onClickHandler가 포함하는 stage, score, timeLeft state들을 제어하기 위해서 이렇게 코드를 작성했습니다.
const createArray = useCallback(() => {
    // type
    type arrayType = {
      backgroundColor: string;
      width: number;
      onClickHandler: () => void;
    }[];

    // choose answer
    const chooseAnswer = {
      rightAnswer: () => {
        setStage(stage + 1);
        setScore(score + timeLeft * stage);
        setTimeLeft(TIME_LEFT_INIT);
      },
      wrongAnswer: () => {
        if (timeLeft < 3) setTimeLeft(0);
        else setTimeLeft(timeLeft - 3);
      },
    };

    // arrayCandidate
    let arrayCandidate: arrayType = Array(block.arrayLength).fill({
      backgroundColor: block.backgroundColor,
      width: block.width,
      onClickHandler: () => {
        chooseAnswer.wrongAnswer();
      },
    });

    arrayCandidate[block.answer] = {
      backgroundColor: block.answerBackgroundColor,
      width: block.width,
      onClickHandler: () => {
        chooseAnswer.rightAnswer();
      },
    };

    return arrayCandidate;
  }, [block, score, stage, timeLeft]);

  const [array, setArray] = useState(createArray());
4. reset state
- reset state는 1 stage에서 게임이 끝났을 때 각 블록들이 새로운 색깔로 변하지 않는 버그가 있어서 추가했습니다. stage 1 => stage 1로 변한 것이기 때문에 (즉 stage가 변하지 않기에), stage마다 block을 변하게 만드는 로직에 포함되지 않아서 이런 버그가 발생했다고 생각합니다. 이를 reset state로 방지했습니다.
- 논리 구조를 어떻게 설계할 것인가
저는 stage가 바뀔때, timeLeft가 바뀔때, 그리고 stage와 timeLeft가 동시에 제어해야하는 array로 나누어 접근했습니다.
1. stage
// stage별 block 세팅
  useEffect(() => {
    if (stage > 1 || reset) {
      const {
        width,
        arrayLength,
        backgroundColor,
        answer,
        answerBackgroundColor,
      } = getBlock(stage);

      setBlock({
        width,
        arrayLength,
        backgroundColor,
        answer,
        answerBackgroundColor,
      });
      setReset(false);
    }
  }, [stage, reset]);
stage마다 블록이 바뀌기에 기존에 선언한 getBlock(stage) 함수를 활용하여 block state를 선언하는 방식으로 했습니다. 위 useEffect의 조건문 stage > 1은 첫번째 렌더링 때 바로 블록이 바뀌는 것을 방지하기 위함이며 reset은 전에 설명했다시피 stage1에서 게임오버가 나와도 block의 색상이 바뀌지 않던 버그를 방지하기 위함입니다.
2. timeLeft
// timeLeft 세팅
  useEffect(() => {
    const id = setInterval(() => {
      setTimeLeft(timeLeft - 1);
    }, 1000);
    if (timeLeft <= 0) {
      window.alert(`GAME OVER!\n스테이지: ${stage}, 점수: ${score}`);
      setStage(STAGE_INIT);
      setTimeLeft(TIME_LEFT_INIT);
      setScore(SCORE_INIT);
      setReset(true);
    }
    return () => clearInterval(id);
  }, [timeLeft, score, stage]);
timeLeft는 매초마다 1씩 줄어들도록 했으며 만약에 0이하로 도달했다면 window.alert를 통해 게임을 중단시키고 다시 처음으로 재설정하다록 했습니다.
3. array
// array 세팅
  useEffect(() => {
    setArray(createArray());
  }, [createArray]);
array state는 그 전에 설명했듯이 array의 각 값들이 포함하는 onClickHandler에 stage, score, timeLeft state를 제어함과 동시에 함수로 관리하기 위해 useCallback을 사용했습니다.
- 랜덤으로 발생하는 색상을 어떻게 제어할 것인가
1. 밝기 제어
색상이 랜덤으로 발생할 때 너무 어둡거나 너무 밝아서는 안되기에 구글을 통해 알아본 결과 HSV를 사용하기로 했습니다. HSV에 대한 구체적 설명 페이지. HSV의 S는 밝기를 높일 수 있는 요소이며, V는 밝기를 낮출수 있는 요소이기에 가장 최적의 방법이라고 생각했습니다.
const randomHSVGenerator = () => {
  const H = Math.floor(Math.random() * 360);
  const S = (Math.floor(Math.random() * 80) + 20) / 100;
  const V = (Math.floor(Math.random() * 30) + 70) / 100;
  return { H, S, V };
};
위의 함수를 통해 밝기가 적절한 수준의 HSV를 랜덤으로 만들수 있도록 했습니다. 그 이후 HSV를 RGB로 전환하는 알고리즘을 사용했습니다. HSV에서 RGB로 전환하는 알고리즘은 stackoverflow의 도움을 빌렸습니다.
2. 난이도 제어
const twist = (RGB: number, stage: number) => {
  const rand = Math.round(Math.random());
  const gap = 25 - Math.floor(stage / 4);
  const gapWithLimit = gap >= 10 ? gap : 10;
  const twistColor = rand
    ? RGB - gapWithLimit < 0
      ? RGB + gapWithLimit
      : RGB - gapWithLimit
    : RGB + gapWithLimit > 255
    ? RGB - gapWithLimit
    : RGB + gapWithLimit;

  return twistColor;
};

export const randomRGBGenerator = (stage: number) => {
  const { H, S, V } = randomHSVGenerator();
  const { R, G, B } = HSVtoRGB(H, S, V);
  return {
    original: `rgb(${R}, ${G}, ${B})`,
    twist: `rgb(${twist(R, stage)}, ${twist(G, stage)}, ${twist(B, stage)})`,
  };
};
난이도는 hsv에서 rgb로 변환한 값에 차이를 주는 방법으로 설정했습니다. 가장 처음에는 각 RGB값에 25를 빼도록 했으며, 난이도가 상승하며 const gap = 25 - Math.floor(stage / 4);를 통해 조금씩 차이를 줄이도록 했습니다. 그러나 원래 RGB의 값과 차이가 10이하로 발생하지 않도록 제어했습니다.
후기
맨 처음에 보고 쉽게 구현할 것이라고 생각했지만, 보기보다 생각해야할 것들이 매우 많아서 고생을 했습니다. 한개라도 논리에 맞지 않으면 알 수 없는 버그들이 발생해서, 버그들이 왜 발생했는지 원인을 찾다가 많은 시간을 할애했습니다. 그래도 완수 할 수 있어서 다행입니다!
'리액트' 카테고리의 다른 글
클래스101 클론 후기 (0) 2022.01.16 react-router-dom (0) 2021.09.15 ref & useRef() & forwardRef() (0) 2021.09.11 Portals (0) 2021.09.08 Context (0) 2021.09.05